
In this post we are going to see one of the most important concept in K8s, Taints and Tolerations.
What is Taint and Toleration?
A taint allows a node to refuse pod to be scheduled unless that pod has a matching toleration. i.e. If a node is tainted, master will never schedule a pod on that node unless that pod is given toleration.
You apply taints to a node and apply tolerations to a pod. A taint on a node instructs the node to repel all pods that do not tolerate the taint.
Taints and tolerations consist of a key, value, and effect. An operator allows you to leave one of these parameters empty.
I hope this definition suffice your understanding, as they are straight forward.
We have read this so often that in K8s, we are not required to manage the pods where it runs, scheduler does that. So why we do we need this?
Need of Taint and Tolerations
- If I have a pod which is doing some advanced computing or processing and I need that pod to be run on dedicated node I can use the concept of taint-toleration and node affinity to schedule pod on specific node.
- If you have nodes with special hardware and you want to repel Pods that do not need this hardware and attract Pods that do need it.
Enough of theory let us do some practical!!!
I’ll be using Play with K8s to create my 2 node 1 master cluster, where node1 will be Master and Node2 and Node3 will be 2 minions.

I’ll be using an open source hello-world yaml from here .
Now create a file hello.yaml and copy the contents of it in the file.
Now let’s taint our node2 to make sure none of our pods are scheduled on it.
#Syntax:
#kubectl taint node node_name key=value:taint-effect
kubectl taint node node2 app=db:NoSchedule
Now before running this command let us understand what is taint-effect.
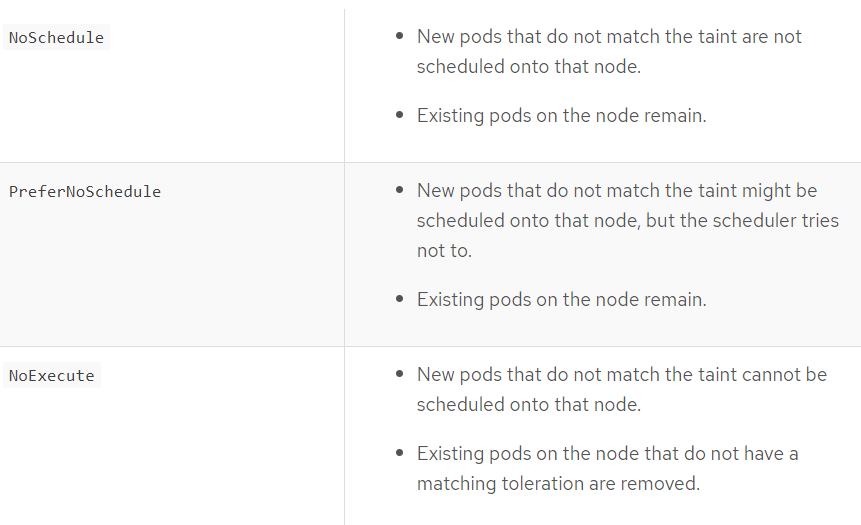
Taint-effect is the property of taint, how do we want to taint the node. We have 3 ways to do so, “NoSchedule”, “PreferNoSchedule”, “NoExecute”
NoSchedule: This will not Schedule any pods on this node unless tolerated.
Run the command to create the deployment and services.
kubectl apply -f hello.yaml

If you see all pods are running on node3, as node2 is tainted.
What if I want to remove the taint on node2, How do I do?
kubectl taint node node2 app=db:NoSchedule-
NoExecute: The taint with the NoExecute effect results in the eviction of all Pods without a matching toleration from the node.
Let us try to put this use case, We will taint a node2 with NoExecute.
kubectl taint node node2 app=db:NoExecute

What did just happened here?
NoExecute has removed all the pods which were scheduled on node2 and recreated them no node3.
So, let’s say I have 3 pods running on node2(1 Pod replica) and node3( 2 Pod replica)
- If I taint a node node2 using NoSchedule, it won’t impact exiting pods and will focus to taint new pods only.
- If I taint a node node2 using NoExecute, it will remove existing pods from the node and recreate them on non-tainted nodes.
PreferNoSchedule
- New pods that do not match the taint might be scheduled onto that node, but the scheduler tries not to.
- Existing pods on the node remain.
Now Since we are clear with Taint, let’s see how do we put toleration on nodes so that it can be scheduled on the tainted node.
Let’s taint a node.
kubectl taint node node2 app=db:NoSchedule
Edit the yaml file as below and add the highlighted code.
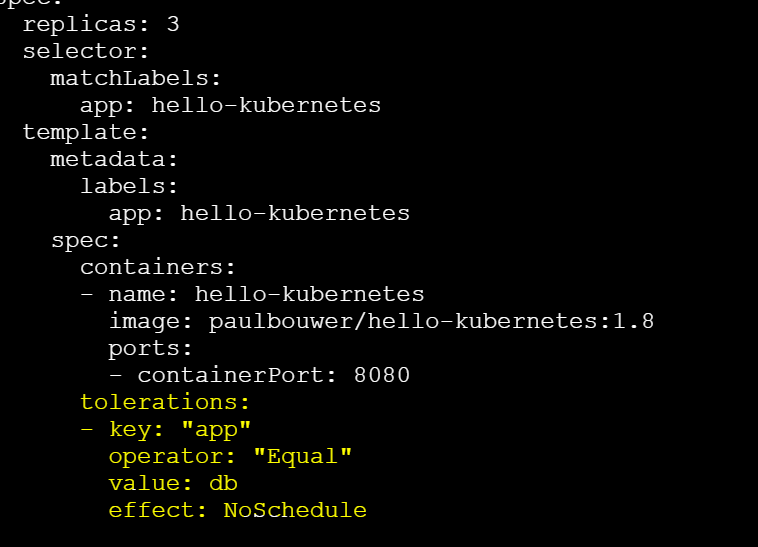
Here we are using the same values which we used to taint the node.
Now let’s run the pod, to make sure these pods do run on node2

So this how we can use taint and tolerations, In the next post we will be seeing NodeAffinity and NodeSelector!! Do keep your queries in the comment box.
