
How often do you see the snapshot of any application in an app store differing from the one you downloaded? Many times!!!
Who wants to have the headache of capturing the screenshot of the application in different languages? No one!!!
In the era of Automation does anyone want to streamline things? Everyone!!!
Here’s the trick to Automate taking Snapshot of your application using Fastlane Snapshot.
So let’s stop wasting time and dive into something really interesting!!
To make this post easy and interesting, I’ll be dividing this into steps so that anyone can try it out… We will go step by step and create our own application!!
Step 1: Install Fastlane
# Using RubyGems
sudo gem install fastlane -NV

# Alternatively using Homebrew
brew cask install fastlane
Congratulations. Half of our work is done!! Easy huh? Next steps are simple too…
Step 2: Create Xcode Project single view application and name it as FastLaneSnapshot

We should be seeing something like this!!
Step 3: Fastlane Setup
Navigate to the terminal to our project’s directory and run
fastlane initOkay, so let’s quickly recap whatever we did, Step 1 was easy Installation of Fastlane, Step 2 was Setting up and creating Project and Step 3 was Fastlane setup for your project.
Step 4: Let’s Build Up
So after successful Step 4, we will be seeing two things in our project directory one is the sanpfile and other is SnapshotHelper.swift.
Let’s Open the project in Xcode and add UITest Bundle, find below images for more…
We’ll be seeing one more folder “FastLaneSnapshotUITests” with extra file “FastLaneSnapshotUITests.swift” will get created.


Step 5: Move SnapshotHelper.swift to UITest folder…

Step 6: Open Snapfile and let’s edit it!
Before we edit, Snapfile is basic configuration file where we store everything from the number and types of devices we want to take screenshot, languages and so on!!!
After opening edit the Snapfile as below!!!
#Uncomment the lines below you want to change by removing the # in the beginning
#A list of devices you want to take the screenshots from
 devices([
    "iPhone 8",
 #"iPhone 8 Plus",
 #"iPhone SE",
 #"iPhone X",
 #"iPad Pro (12.9-inch)",
 #"iPad Pro (9.7-inch)",
 #"Apple TV 1080p"
 ])
 languages([
    "en-US",
  #  "de-DE",
 #"it-IT",
 #["pt", "pt_BR"] # Portuguese with Brazilian locale
 ])
 #The name of the scheme which contains the UI Tests
 scheme("FastLaneSnapshot")
 #remove the '#' to clear all previously generated screenshots    before creating new ones
 clear_previous_screenshots(true)
Let’s quickly see what’s mystery is in this file….So comment out the devices on which you do not want to take screenshots and same goes with languages, rest everything is understandable!!
Step 6: Build an application to test
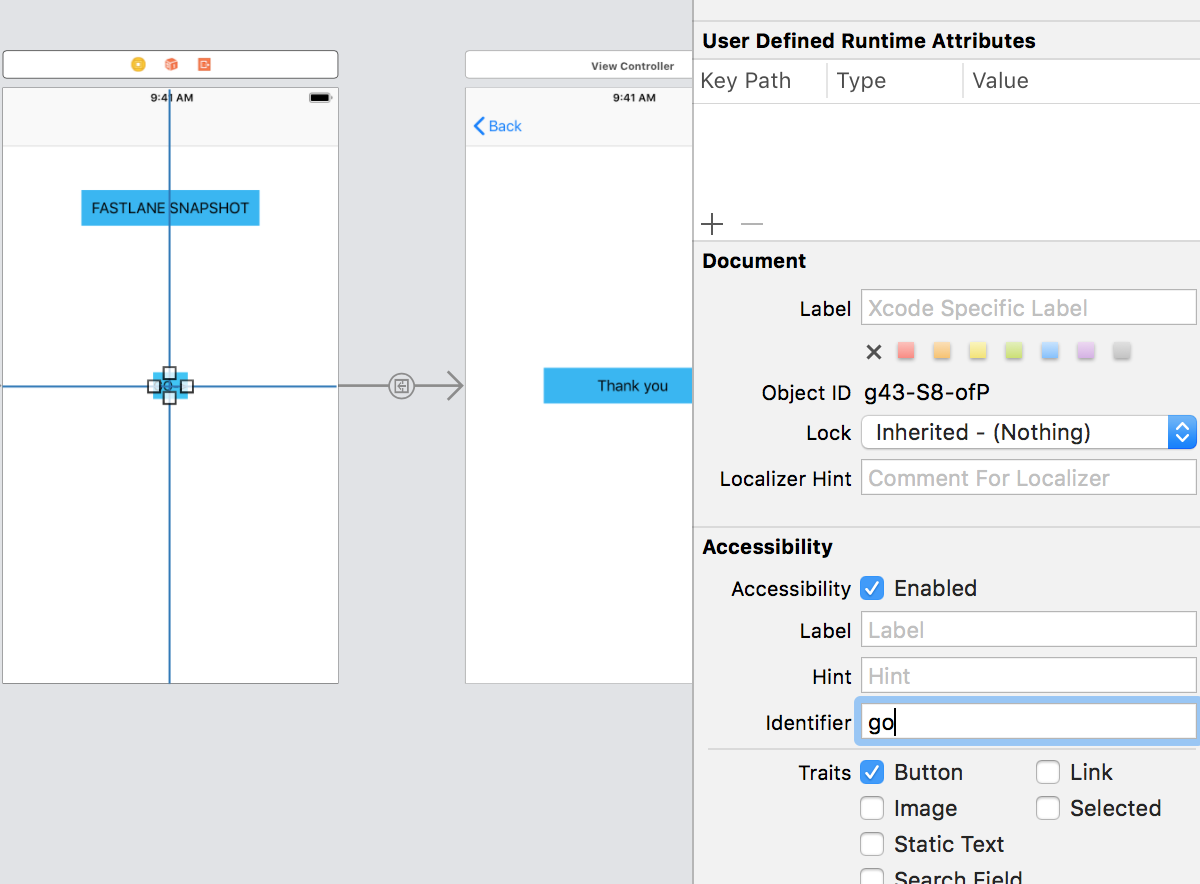
Go to Main.storyboard and develop two screens. Screen 1 will have a button (go)and label (Fastlane Snapshot) on tapping go will navigate two Screen 2.
Make sure you connect the two View Controllers by segue and embed in Navigation Controller

Run the application and see whether the app is working!! On tapping go you should be navigated to screen 2.
Make sure we add an identifier to button “go”. This will help to identify button when we tap for UI test case.
Step 7: Let’s create UI Test case
Open “FastLaneSnapshotUITests.swift” and copy the following code!!
import XCTest
class FastLaneSnapshotUITests: XCTestCase {

     let app = XCUIApplication()
     override func setUp() {

         super.setUp()
         // add this extra line to make sure Snapshot works
         setupSnapshot(app)
         app.launch()
     }
     override func tearDown() {
     }

     func testFirstScreen() {
         snapshot("Screen 1")
     }

     func testSecondScree() {

         let button = app.buttons["go"]
         button.tap()
         snapshot("Screen 2")
     }
 }
Above code is self explanatory!! If you feel you’re not able to understand above code this tutorial is not for you and should probably first read out this.
Step 7: What Next? We’re done!!
Navigate to the terminal to our project’s directory and run
fastlane snapshot
That’s it!! we are done, Fastlane will automatically create a folder called screenshot in your project directory, having all the screenshots and one .html file which will open all the screenshot as webpage.


Here we go!! Check out the screenshots !!
Thank you for reading it, If you have any queries comment below and I’ll be more than happy to help you out.

So will the language of the app changes if i just change them in the SnapFile. For instance i had uncommented “de-DE” as well. But the final screenshots generated were 2 sets but both english. Why is that happening, i am pretty new to Xcode?
LikeLike
When we specify the language in the snap file, corresponding language support should be there in the application also. If yes, it will generate the screenshot in the languages you want.
LikeLike