
Mutual TLS (mTLS) is a security mechanism that requires both the client and the server to verify each other’s identities using digital certificates. In contrast to one-way TLS, where only the server’s identity is validated, mTLS adds an extra layer of security by ensuring mutual authentication. Vault’s PKI secrets engine streamlines the management of these certificates by enabling automated issuance, renewal, and revocation, making the process more efficient and secure.
In this post, you’ll learn how to set up Vault’s PKI secrets engine to generate certificates for mTLS and integrate those certificates with your NGINX server.
Prerequisites
Installing Vault CLI on Linux –
Using a package manager (Ubuntu/Debian)
Run the following commands:
$ curl -fsSL https://apt.releases.hashicorp.com/gpg | sudo apt-key add -
$ sudo apt-add-repository "deb [arch=amd64] https://apt.releases.hashicorp.com $(lsb_release -cs) main"
$ sudo apt update && sudo apt install vault
Start the Vault development server –$ vault server -dev
Set the Vault address –
Open a new terminal window and configure the Vault server address to enable communication via the CLI.$ export VAULT_ADDR='http://127.0.0.1:8200'
Generate mTLS Certificates with Vault
Step 1: Activate the PKI Secrets Engine
Run the following command to enable the PKI secrets engine:$ vault secrets enable pki
If successful, you’ll see:Success! Enabled the pki secrets engine at: pki/
Step 2: Adjust the PKI Secrets Engine Settings
Now, set the maximum lease duration for the certificates:$ vault secrets tune -max-lease-ttl=8760h pki
Upon success, you should get:Success! Tuned the secrets engine at: pki/
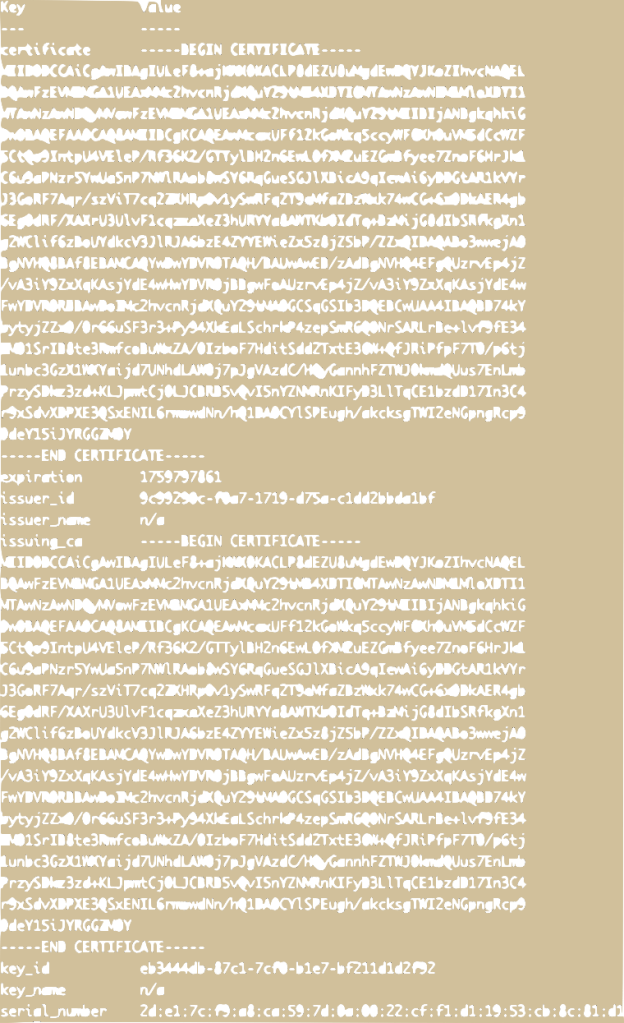
Step 3: Create a root certificate$ vault write pki/root/generate/internal common_name="shortcut.com" ttl=8760h
This command generates a root certificate with a validity period of 8760 hours. You should see an output similar to:
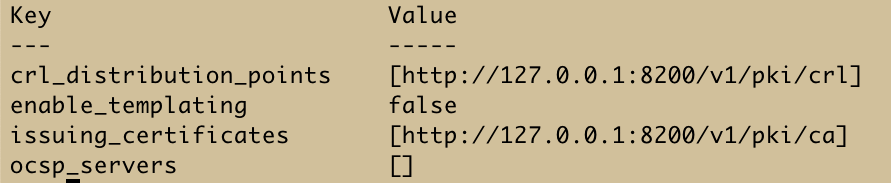
Step 4: Set up the Certificate Revocation List (CRL) and define the URLs for issuing certificates
$ vault write pki/config/urls \
    issuing_certificates="http://127.0.0.1:8200/v1/pki/ca" \
    crl_distribution_points="http://127.0.0.1:8200/v1/pki/crl"
After running this command, you should see an output similar to
Step 5: Create a Certificate Role
Use the following command to create a role for issuing certificates:
$ vault write pki/roles/shortcut-role \
    allowed_domains="test.shortcut.com" \
    allow_subdomains=true \
    max_ttl="72h"
Step 6: Generate Client and Server Certificates
- Client Certificate:
$ vault write pki/issue/shortcut-role \
    common_name="client.test.shortcut.com" \
    ttl="72h" > client_cert.json
Note: The certificates are stored in key-value pairs in client_cert.json. Copy the certificate’s value and private key and store them in two different files named as client.crt and client.key respectively.
- Server Certificate:
$ vault write pki/issue/shortcut-role \
    common_name="server.test.shortcut.com" \
    ttl="72h" > server_cert.json
Note: The certificates are stored in key-value pairs in server_cert.json. Copy the certificate’s value and private key and store them in two different files named as server.crt and server.key respectively.
Step 7: Retrieve the Root Certificate
Run this command to download the root CA certificate:$ vault read -field=certificate pki/cert/ca > ca.pem
Set Up NGINX for mTLS Authentication
Step 1: Install NGINX
Ensure NGINX is installed on your machine. If it isn’t, run the following commands:$ sudo apt update
$ sudo apt install nginx
Step 2: Update NGINX Configuration for mTLS
Open the NGINX configuration file—usually located at /etc/nginx/sites-available/default—and modify it to enable mutual TLS:
server {
    listen 443 ssl;
    server_name server.test.shortcut.com;

    ssl_certificate /path/to/server.crt;
    ssl_certificate_key /path/to/server.key;
    ssl_client_certificate /path/to/ca.pem;
    ssl_verify_client on;

    location / {
        root /var/www/html;
        index index.html;
    }
}- server.crt and server.key: These were generated earlier and saved in the
server_cert.jsonfile. - ca.pem: This is the root CA certificate you retrieved previously.
Step 3: Apply the Configuration
Restart NGINX to implement the changes:$ sudo systemctl restart nginx
Step 4: Test mTLS with the Client
To verify the setup, use the curl command with the client certificate, key, and CA certificate:
$ curl --cert client.crt --key client.key --cacert ca.pem https://server.test.shortcut.com- client.crt and client.key: These were obtained from the
client_cert.jsonfile.
If the command runs successfully, mTLS is correctly configured, and your NGINX server is now secured with certificates issued by Vault.
