Almost all kinds of businesses are driven by data today and we are all aware of the problem called ‘Big Data’. And Big data is not a single problem its an umbrella of problems such as volume, velocity etc.
Having said that Apache Hadoop is one of the most popular tool for dealing with Big Data. However this article is not about what is Hadoop and it assumes some knowledge of it. In this article I want to address one of the basic problem that occurs while using Hadoop.
What is hadoop?
Hadoop is an open-source framework that allows to store and process big data in a distributed environment across clusters of computers using simple programming models. It is designed to scale up from single servers to thousands of machines, each offering local computation and storage.
What is Hadoop Cluster?
A Hadoop cluster is nothing but a group of computers connected together via LAN. We use it for storing and processing large data sets. Hadoop clusters have a number of commodity hardware connected together. They communicate with a high-end machine which acts as a master. These master and slaves implement distributed computing over distributed data storage. It runs open source software for providing distributed functionality.
Hadoop cluster has master-slave architecture:-

i. Master in Hadoop Cluster
It is a machine with a good configuration of memory and CPU. It is also referred to as Namenode.
Functions of NameNode
- Manages file system namespace
- Regulates access to files by clients
- Stores metadata of actual data. For example — file path, number of blocks, block id, the location of blocks etc.
- Executes file system namespace operations like opening, closing, renaming files and directories
The NameNode stores the metadata in the memory for fast retrieval. Hence we should configure it on a high-end machine.
ii. Slaves in the Hadoop Cluster
It is a machine with a normal configuration. It is also referred to as Datanode.
Functions of DataNode
- It stores the business data.
- It does read, write and data processing operations
- Upon instruction from a master, it does creation, deletion, and replication of data blocks.
The Basic problem that occurs while using Hadoop:-
Whenever we want to share storage from data node to name node there is as such no effective way to limit the amount of storage you want to share and by default the complete available space of data node is shared, this limitation can be bypassed by using LVM to share the storage rather than normal partitions.
There is one more benefit of using LVM to share the storage and that is Elasticity. Because LVM can be resized very easily we can increase or decrease storage shared to the master on the go as required.
Let us see how this can be done in a few simple steps, later I will also provide a simple python TUI (Terminal User Interface) script using which we can semi-automate this process.
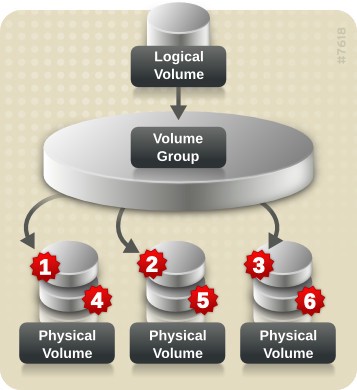
What is LVM?
Managing disk space has always been a significant task for sysadmins. Running out of disk space used to be the start of a long and complex series of tasks to increase the space available to a disk partition. It also required taking the system off-line. This usually involved installing a new hard drive, booting to recovery or single-user mode, creating a partition and a filesystem on the new hard drive, using temporary mount points to move the data from the too-small filesystem to the new, larger one, changing the content of the “/etc/fstab” file to reflect the correct device name for the new partition, and rebooting to remount the new filesystem on the correct mount point.
LVM allows for very flexible disk space management. It provides features like the ability to add disk space to a logical volume and its filesystem while that filesystem is mounted and active ( Dynamically / ONLINE ) and it allows for the collection of multiple physical hard drives and partitions into a single volume group which can then be divided into logical volumes.
Note :- Before getting started You must have a Hadoop cluster up and running with at least one data node for following along and I am not discussing here how to do it for the sake of brevity and simplicity.
Steps
All the steps shown in the following section are carried out in the data node labelled ‘speedy’.
Step 1 :
Ok so first things first we need to create a Logical Volume using which we will share storage to the Master but for that we need to create a Physical Volume First so let’s do it.
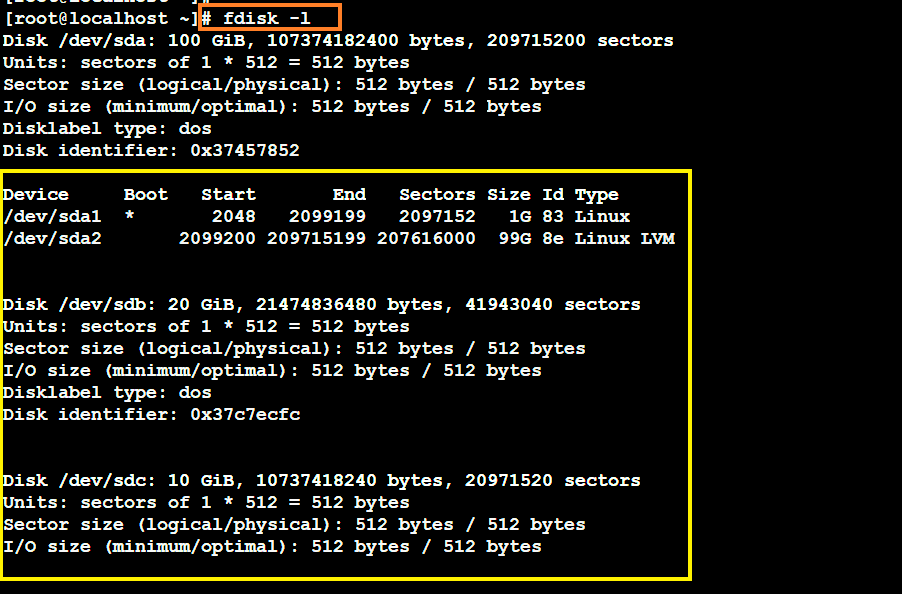
As seen in the figure above, I have added two new Hard disks of 20GB and 10GB to create the Volume Group, but first we need to convert each of them into physical volume. (visible as “/dev/sdb” and “/dev/sdc” respectively)
Step 2 :
Now I am creating a PV out of both the hard disks.

Using command “pvdisplay” we can take a look at all the Physical Volumes present.

Step 3 :
Now as we converted both the hard disks into physical volumes, Now its time to combine both of them to create a Volume Group out of which we will create a Logical Volume to share storage to name node.

As seen in the figure above we have created the Volume Group named ‘hadoop-volume’ out of the PVs.
Step 4 :
Finally we are ready to create a Logical Volume which is analogous to a partition using which we will share storage to the master node unlocking the power to limit and increase or decrease the amount of storage shared.
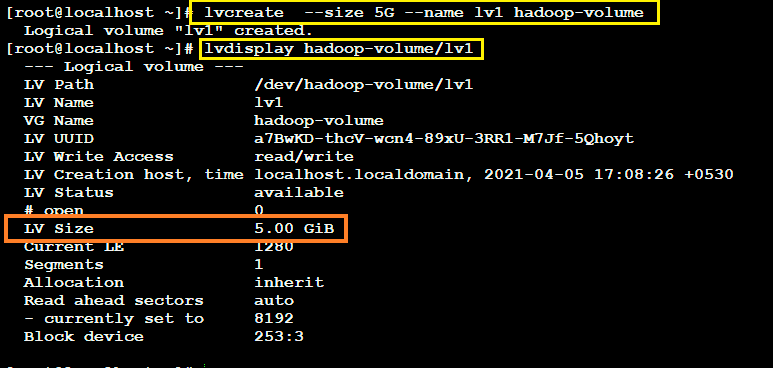
Here I have created a LV of size 5Gib initially with the name ‘lv1’
Now we can limit the storage shared by simply mounting the created LV to the folder shared with the master node, But before I do this I want to show you the current configuration of my cluster, for simplicity I am using a single data node.
Clearly currently I am sharing the entire Available storage of my “root partition” (50 GiB) to the cluster, but now you will see the difference when I mount the newly created LV to the shared folder which in my case is “/hadoop-lvm”
Step 5 :
Now all that remains is to format the partition and mount the LV to the shared folder which will limit the amount of storage shared to the size of LV which is 5GB currently.
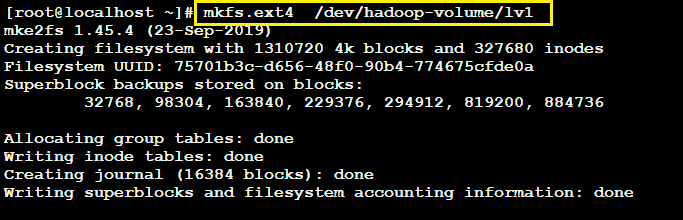
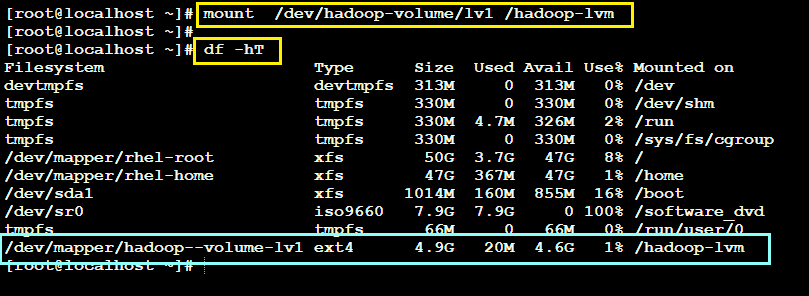
Clearly the LV is formatted using “mkfs.ext4″ format type and then mounted to the shared folder which is “/hadoop-lvm” in my case.
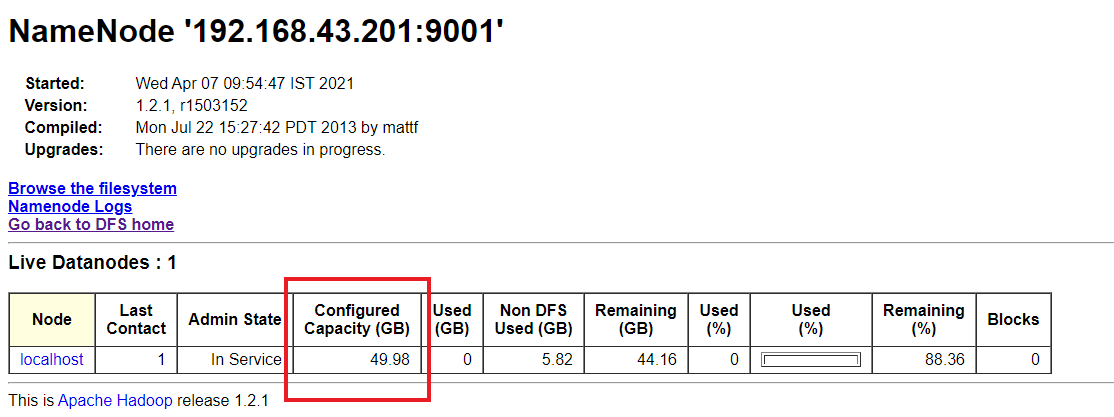
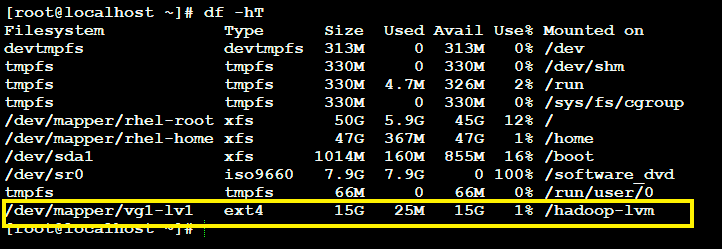
Now if we take a look at the Hadoop’s Web UI to see the current configuration then:-

As seen in the figure we have successfully constrained the shared storage now let’s go for elasticity.
Step 6 : Dynamically increasing the volume of DATANODE
For the demonstration I am increasing the shared storage from 5GB to 15 GB but using similar concept it can also be decreased.
Now here comes the master command which is ‘lvextend’. This command allows us to resize the LV as we go and as required to quickly change the amount of storage shared to the cluster.
Then we have to use “resize2fs “ command for online formatting the newly created partition.

After resizing let us see whether we were able to increase the shared storage from 5GB to 15GB.

So finally we were able to Elastically increase the shared storage by using LVM with Hadoop.
STEP 7: Dynamically decreasing the volume of DATANODE
Now , lets try to reduce the shared storage from 15 Gib to 10Gib, Here we have to take some extra steps in order to reduce the size.
NOTE: Reducing the size of shared storage is not recommended at all . You will loose your whole data of that partition..! (This is just a demo)
Steps to reduce the shared Storage:-
- Unmount the Logical Volume using command “umount”.
- Clean the partition to be removed (if there is any garbage , it will be removed) using command “e2fsck”.
- Formatting the partition to be removed using command “resize2fs”.
- Reducing the shared storage by removing the required partition using “lvreduce” command.
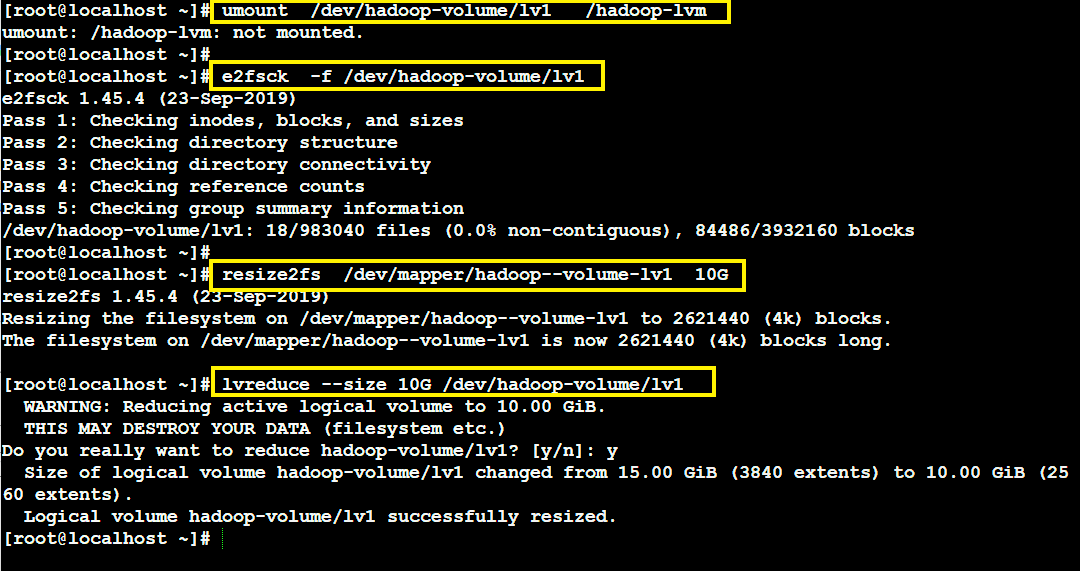
And the shared storage is successfully reduced .

NOTE: Reducing the shared storage is not recommended at all..!

Automating the Process:
The steps I followed to integrate LVM with Hadoop to leverage Elasticity so far were very much manual but in real world you won’t be sitting on your workstation and then manually following these steps to Increase or decrease the size of LV as requirement comes
That’s why here I have also shared a very basic python script which kind of automates the process but still some manual input is required, however if exact requirement is well known then we can use configuration management tools such as Ansible or Chef to completely automate the process.
Click for complete code from GitHub.
Conclusion
So that’s how we can leverage the concept of LVM in Linux partitions to elastically increase or decrease the amount of storage shared from the data node to name node, Thanks for reading.